How to Charge a Mini Split? (Methods & Procedures)
Mini splits don’t work properly when they’re low on refrigerant. If your mini split is low on refrigerant, you’ll have to charge it with the right amount. So, how do you properly charge a mini split?
To charge a mini split, you must first vacuum the system. Then, use a manifold gauge and charge the correct type of refrigerant into the mini split. The amount of refrigerant charged into a mini split should be based on the manufacturer’s recommendation.
The amount of refrigerant required by a mini split is often measured in terms of the weight of the refrigerant. However, other methods of charging a mini split are also acceptable under certain conditions.
Mini Split Charging Procedure
The charging procedure for mini splits is typical. You can find the brief instruction in the installation manual. Following is the charging procedure with additional information for better clarity:
1. Vacuum the Mini Split System
Vacuum or evacuate the mini split system is a process to remove moisture and air in the refrigerant lines. Mini splits don’t perform well when there is moisture inside the system. Hence, this is a crucial step.
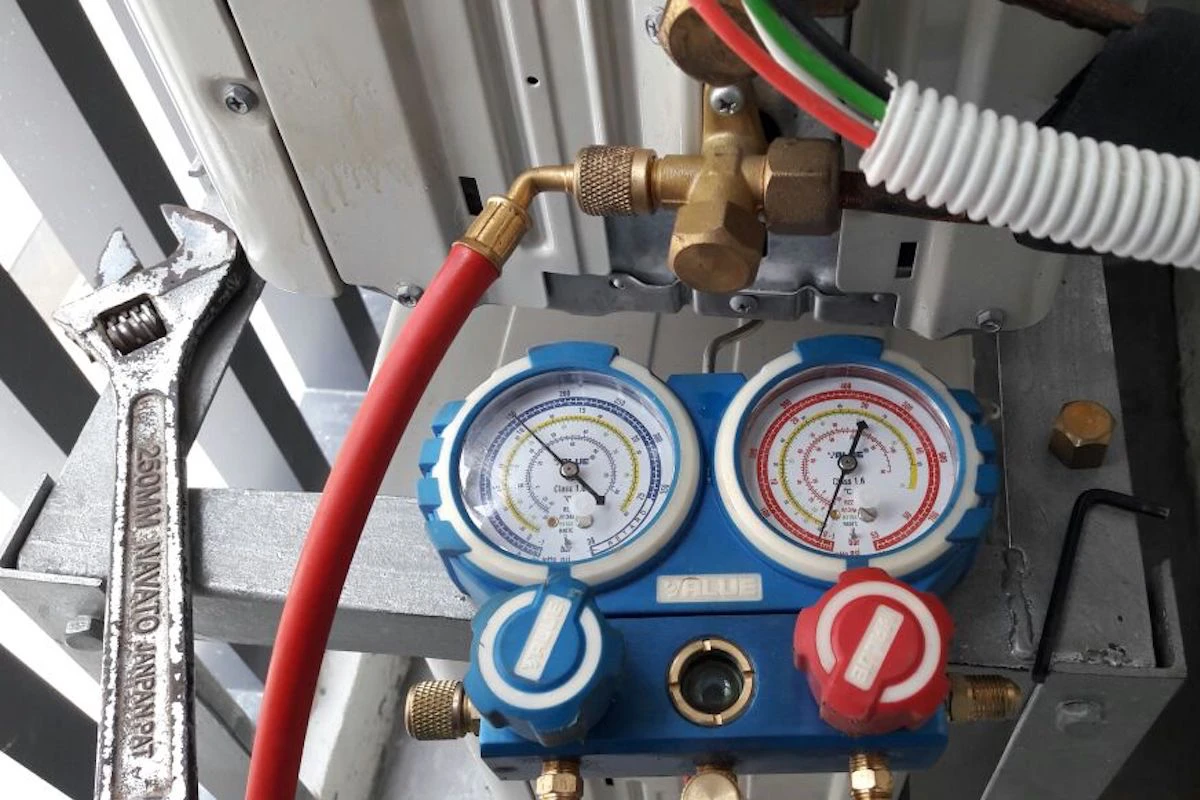
To vacuum a mini split system, prepare a vacuum pump and a manifold gauge. Connect the yellow hose from the manifold gauge to the vacuum pump and the blue hose from the manifold gauge to the service port at the outdoor unit.
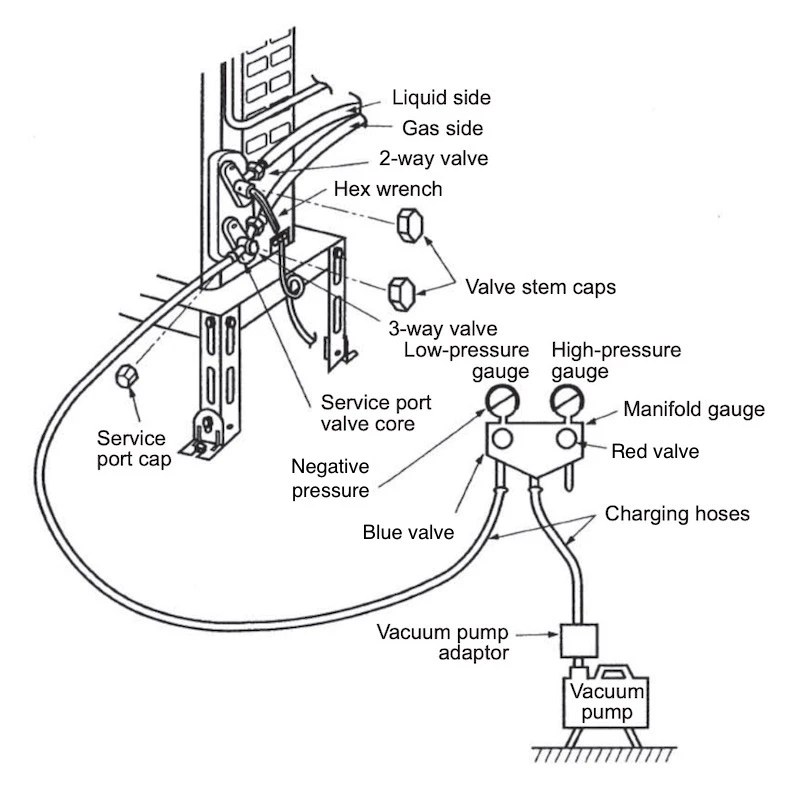
You may also use a micron gauge to measure and read the vacuum pressure. Manufacturers often recommend vacuuming the mini split system to below 500 microns.
Next, open the caps and make sure the 2-way valve and 3-way valve on the outdoor unit are open.
Then, fully open the blue valve (low side) and fully close the red valve (high side) on the manifold gauge and start the vacuum pump. You should see a rapid drop in the low side pressure (blue gauge) from positive to negative.
Keep the vacuum pump running and the low side pressure at negative for about an hour.
Once the pressure is stabilized, fully close the blue valve on the manifold gauge and turn off the vacuum pump. Hold the vacuum pressure for a few minutes to confirm if there is no leak and then proceed to the next step.
2. Select the Right Refrigerant
Prepare the correct type of refrigerant that matches the refrigerant of the mini split. You can check the type of refrigerant used by the mini split from its nameplate.
Place the refrigerant tank on a digital scale to measure the initial weight of the refrigerant. Later, as you release the refrigerant, the weight of the refrigerant will drop and that’s how much you’ve added into the mini split.
If you’re using R410A refrigerant, check the refrigerant tank instruction for proper charging orientation. Most R410A refrigerant tanks need to be placed upside down while those with a dip tube don’t.
Then, disconnect the yellow hose from the vacuum pump and connect it to the refrigerant tank. Open the valve at the refrigerant tank and proceed to the next step.
3. Charge the Mini Split by Refrigerant Weight
The pressurized refrigerant tank is connected to the low side of the mini split. So, whenever you open the blue valve on the manifold gauge, the refrigerant will flow from the tank to the mini split.
Before that, check the amount of refrigerant required by your specific mini split model. It is usually written on the nameplate of the outdoor unit. Otherwise, check the installation manual.
For example, a 9000 BTU R410A mini split may require 2.6 lb of R410A refrigerant. This amount of refrigerant may be based on a maximum refrigerant pipe length of 25 ft or 50 ft (one-way).
So, refer to the installation manual to check how much additional refrigerant is needed. For instance, you may need 0.01 lb of refrigerant per additional ft.
To charge refrigerant into the mini split, partially open the blue valve on the manifold gauge for 1-2 seconds and shut the valve to release about 5 oz of refrigerant into the mini split at once. Do not insert too much refrigerant at once.
Repeat the process until the required amount of refrigerant is fully charged into the mini split system.
When the refrigerant charge is completed, disconnect the blue hose from the mini split service port quickly and put back the service cap. You may put soap water on the cap to check for any leaks.
Turn on the mini split and check for any abnormalities.
By the way, if you want to learn more about mini split especially how to design it for your house, consider my Mini Split (eBook). You’ll learn what is Mini Split, how to choose and more importantly, spark more design ideas to improve the energy efficient of your house. But, if you need a second opinion or want someone to help you design, then you can consider my consultation service.
Consultation Service
Ask me for HVAC advice such as brand selection, best model, benefits, features, placement, duct size, grille size, how to design, design check, verification and other HVAC related queries.
Charging a Mini Split by Pressure
The above mini split charging procedure is sometimes known as charging by refrigerant weight. A simpler method known as charging by pressure is also practiced by many people.
Manufacturers always recommend charging a mini split by refrigerant weight because the refrigerant pressure of a mini split varies based on operating conditions such as indoor/outdoor temperatures, fan speed and temperature settings.
So, charging a mini split by refrigerant weight eliminates all the unnecessary factors.
See the working pressure of R410A mini splits and learn how the operating conditions affect the refrigerant pressure: Mini Split R410A Refrigerant Working and Test Pressure.
Charging a mini split by refrigerant weight requires you to have a digital scale. Besides, if your mini split is low on refrigerant, you’ll need to calculate how much additional refrigerant is needed.
Therefore, to simplify the process, some people choose to charge their mini split by refrigerant pressure.
Following are the steps to charge a mini split by refrigerant pressure:
- Turn on the mini split and set the temperature to the lowest and the fan speed to the highest. This is to force the compressor to run while you’re charging the refrigerant.
- Connect the blue hose from the manifold gauge to the service port at the outdoor unit. Then, connect the yellow hose from the manifold gauge to the refrigerant tank.
- Check the current low side pressure. A properly charged R410A mini split typically operates at about 110-140 psi in cooling mode and 250-400 psi in heat mode.
- Follow the instruction to rotate the refrigerant tank upside down (for R410A).
- Open the valve at the refrigerant tank and partially open the blue valve at the manifold gauge to release the refrigerant into the mini split. Do not insert too much refrigerant at once.
- As the refrigerant is being added to the mini split, the low side pressure (blue gauge) should rise. Every time you open the blue valve, let the pressure stabilize first before you add more refrigerant into the system.
- Continue to add the refrigerant until the low side pressure reaches the typical operating range.
- Disconnect the hose and check the supply air temperature at the indoor unit. In cooling mode, the supply air temperature should measure at about 50-54°F.
Charging a mini split that is low on refrigerant by topping up more refrigerant based on the typical operating pressure is simpler and cheaper. It is a workable method, especially when the mini split is only slightly under-pressure.
However, there is a chance the mini split won’t perform as well as it should because R410A is a mixture of two different refrigerants at a specific percentage. When the refrigerant in a mini split leaks, the mixture percentage is disturbed and so does the performance of the mini split.
Thus, manufacturers always recommend recovering all of the remaining refrigerants in the system and recharging it with new refrigerant.
Pressure and Running Amp
In weather-stable countries like Malaysia, mini splits are mostly charged by pressure and verified based on the running amp (rated current) of the outdoor unit.
This is only applicable to mini splits located in regions where the outdoor temperature is close to the mini split rated conditions. Here, mini splits usually draw about the same amperage as the rated current stated on the nameplate.
So, when the running amp is in the range of the rated amp, the refrigerant level of the mini split is appropriate.
The rated current of mini splits is based on a specific condition. The running amp of a mini split is approximately the same as the rated current when it is operating at the specific condition.
In my past projects, we charge over thousands of mini splits based on the low side pressure and running amp. By doing so, we don’t need to calculate the refrigerant pipe length and measure the weight of the refrigerant being charged into the system.
Once the low side pressure is between 110-140 psi and the running amp is in the range, we know the mini split is sufficiently charged.
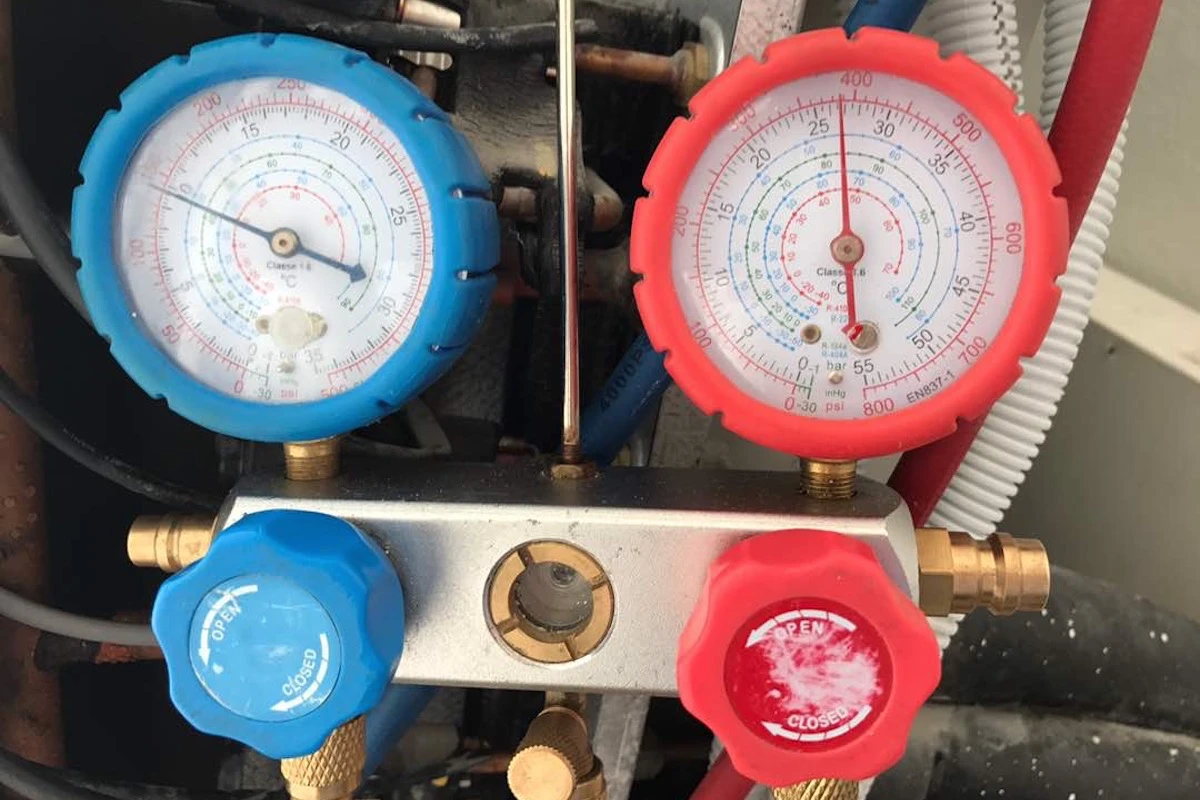
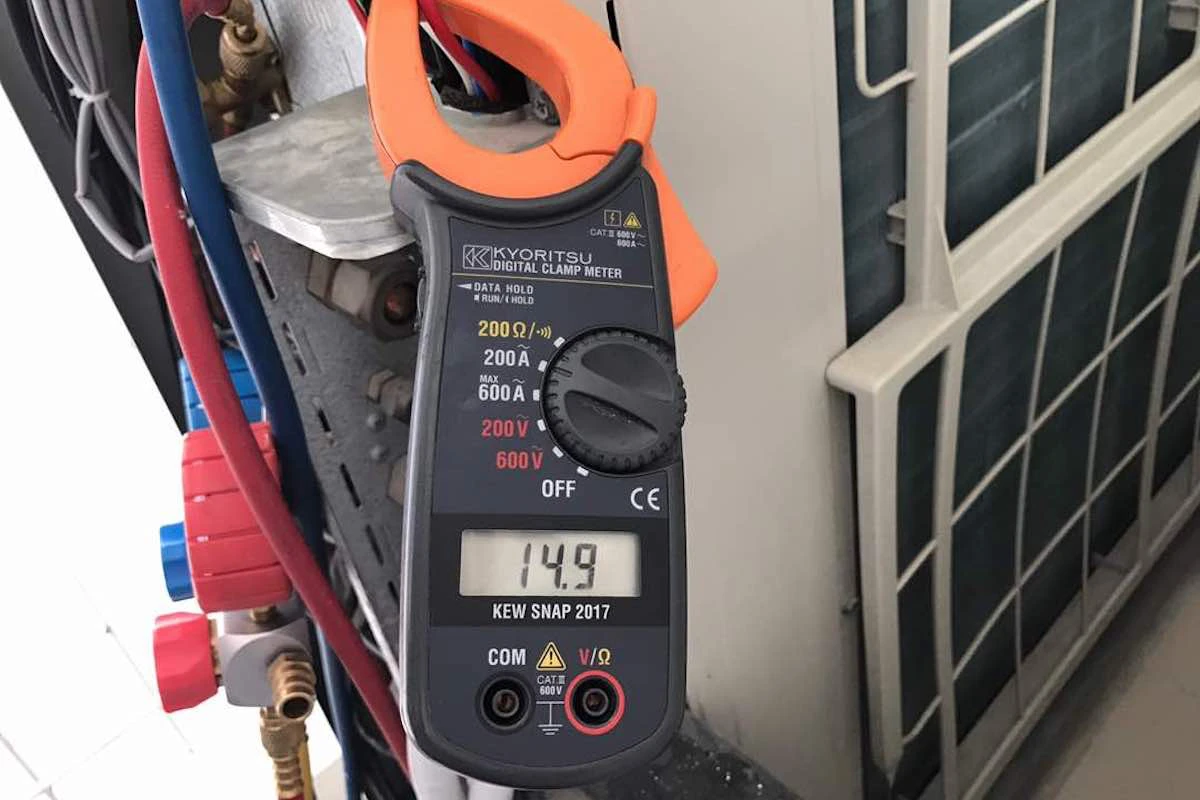
Nonetheless, it is often not recommended to use the running amp as a benchmark when charging a mini split as the operating conditions for every mini split are different.
When Do You Need to Charge a Mini Split?
Newly installed mini splits mostly don’t require you to charge more refrigerant. Generally, mini splits are pre-charged for a refrigerant pipe length up to about 25 ft, depending on what the manufacturer offers.
So, if you’re installing a new mini split system and the refrigerant pipe length from the indoor unit to the outdoor unit does not exceed 25 ft, you don’t have to add more refrigerant into the system.
Instead, simply open the 2-way and 3-way valves when the refrigerant pipes are connected to release the pre-charged refrigerant inside the outdoor unit.
However, if you need to extend the refrigerant pipe beyond 25 ft, you’ll need to add more refrigerant based on the amount suggested by the manufacturer (refer to the installation manual).
In this case, you just need to vacuum the refrigerant pipe, release the pre-charged refrigerant and top up the refrigerant based on the required weight.
If you have a mini split that is suddenly low on refrigerant, it means that there is a leak somewhere along the refrigerant pipe or within the mini split (indoor/outdoor unit) itself.
In this case, you need to repair the leak first before you charge the refrigerant into the system. Else, the refrigerant will continue to leak.
Why Your Mini Split Keep Losing Refrigerant?
Properly installed mini splits are generally able to maintain their refrigerant pressure even after many years. If you find yourself constantly needing to recharge the mini split, you can assure that there is a leak somewhere in the system.
Charging is not part of the regular maintenance for mini split systems. My mini splits have been running for more than 5 years and I’ve never needed to charge them.
Can You Put Too Much Refrigerant in a Mini Split?
A typical R410A refrigerant tank is pressurized to about 400 psi while the typical low side pressure of a mini split is 110-140 psi.
So, if you didn’t wait for the pressure to stabilize every time you release the refrigerant into the mini split, you may end up putting too much refrigerant in the mini split.
Mini splits don’t perform better when there is more refrigerant running in their system.
This is because we need the right amount of refrigerant to ensure the mini split system can operate at the refrigerant temperature that we want.
If a mini split has too much refrigerant, the refrigerant temperature at the indoor unit will be too high. In that case, you may see something like 65-70°F in the supply air temperature which is not low enough for cooling and dehumidification.
Can You Charge a Mini Split by Yourself?
If you’re installing a mini split that is more than 25 ft in the refrigerant pipe length by yourself, you can charge the mini split with more refrigerant by yourself.
However, if you have an existing mini split that is low on refrigerant, you probably need a professional to check and repair the leak.
In many cases, a leaked R410A mini split needs a full recovery of the remaining refrigerant in the system and charge it with new R410A refrigerant to maintain the R410A mixture percentage.
Else, you may see a drop in the performance. This is one of the reasons why some people find their mini split still not cooling (or not as cold as before) despite having the correct refrigerant pressure.
Hence, you likely need a professional to help you recover the refrigerant, fix the leak (which may involve some brazing work), vacuum the system, recharge the system and test everything.
Lastly, consider my Mini Split (eBook) if you want to know how can you use Mini Split in your house. If you still have doubt or not feeling confident enough, feel free to consult me.
Consultation Service
Ask me for HVAC advice such as brand selection, best model, benefits, features, placement, duct size, grille size, how to design, design check, verification and other HVAC related queries.


