Chilled Water Pump Connection Details with Explanation
When I was working on my first chilled water system project, I spent many hours trying to figure out all the valves and sensors connecting to chilled water pumps. Hence, I decided to write a post to explain the chilled water pump connection.
To explain the chilled water pump connection details, I’ll be using a schematic from my previous work on air-cooled chillers. I’ll be explaining the location, symbol, and purpose of each valve and joint.
Below is the schematic diagram:
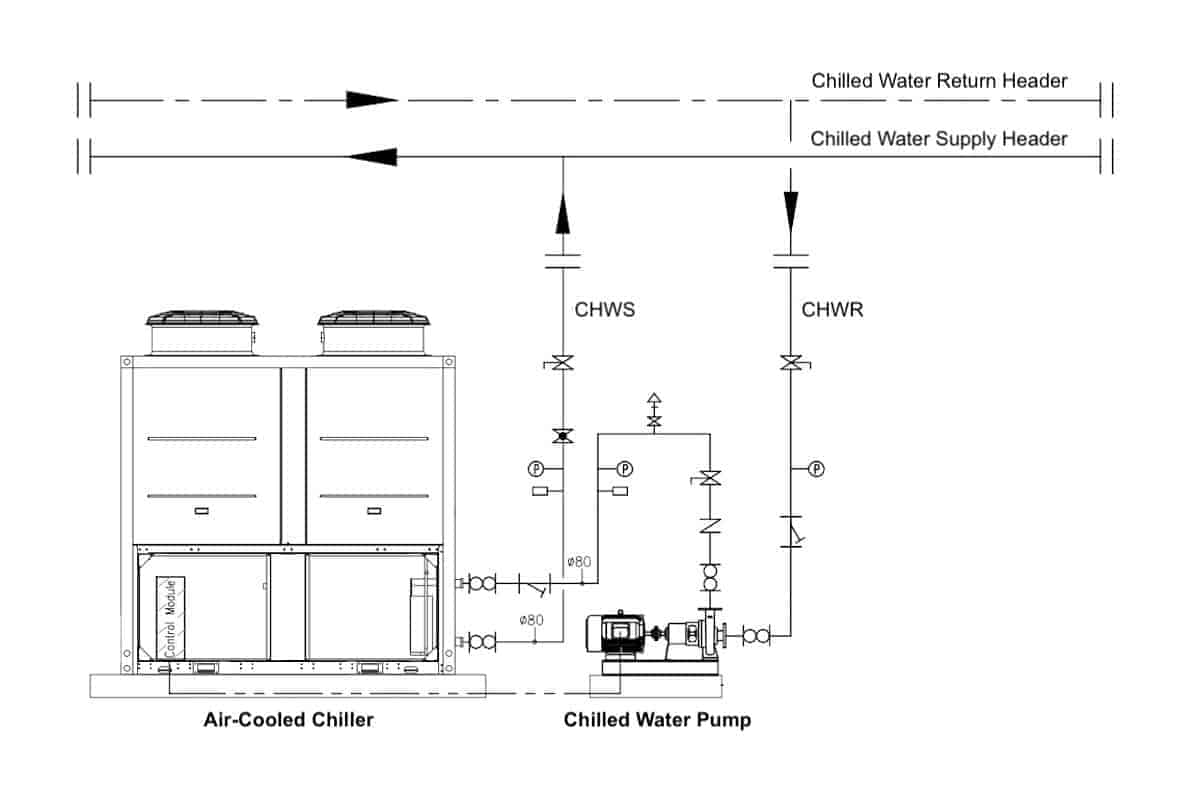
In the above diagram, the chilled water returns to the chilled water pump before entering the air-cooled chiller and head back to the chilled water supply header. Let’s look at each of the connected components.
Isolation Valves
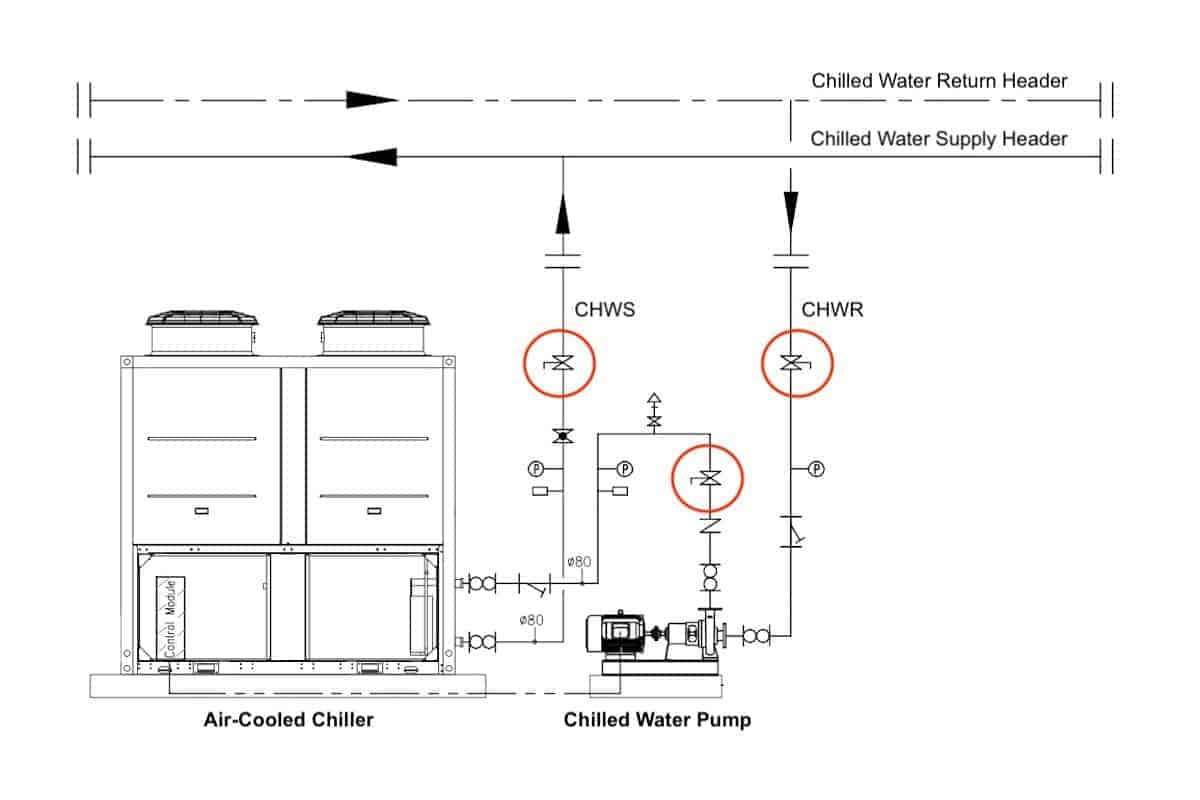
Isolation valves are used to isolate a section of pipe and prevent water from flowing through in order for people to do maintenance and repair works.
In chilled water systems, butterfly valves are mostly used for pipe sizes above 50mm. Below 50mm pipe sizes use gate valves to isolate and stop water from flowing through chilled water pumps.
Isolation valves such as butterfly valves use flange connections. A flange connection has different standards such as PN and JIS. The standard must match in order to fit well and prevent water leakages.
On the other hand, gate valves are usually internally threaded. The thread standards are mainly two types; a) BSPP and b) BSPT. Most of the time, gate valves are BSPT threaded.
Isolation valves should be installed before and after all valves and sensors. There should be no more valves behind or after an isolation valve. Otherwise, those valves are not able to be repaired or replaced.
Both butterfly valves and gate valves can be installed horizontally or vertically.
Some isolation valves also serve as balancing valves. During commissioning, we can fine-tune them to get the required water flow rate and balance the system. If that’s the case, certain isolation valves may cause turbulent flow and lead to inaccurate flow detection which can cause tripping problems.
Generally, ball valves are better than gate valves in terms of preventing turbulent flow.
In large water piping systems, ball valves should be used with caution as they can easily cause serious water hammer issues.
Y-Strainer
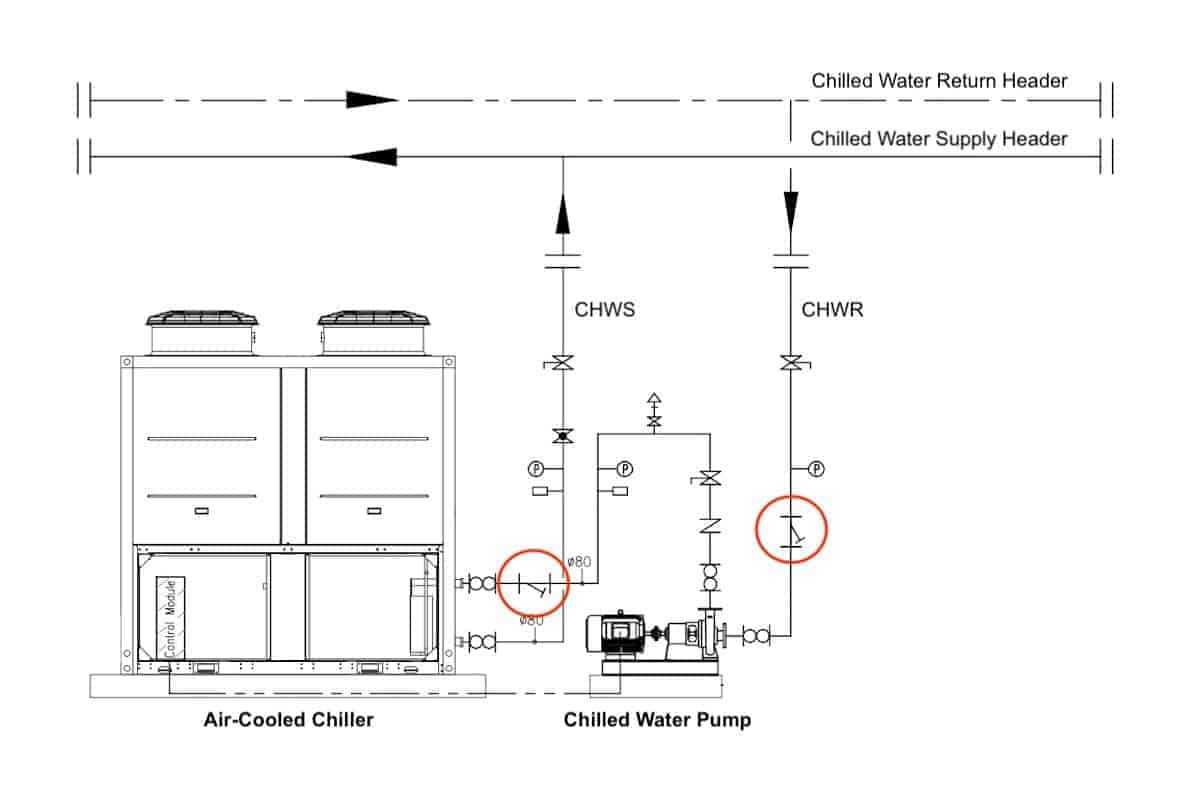
Y-strainers are basically filters for water. Hence, they should be installed before the inlet of chilled water pumps.
In the side diagram, a y-strainer is installed after the chilled water pump to further protect the heat exchanger of the air-cooled chiller.
Y-strainers have different filtration ratings. Standard y-strainers are good enough for chilled water pumps but if you are trying to protect expensive heat exchangers such as brazed-plate heat exchangers, the filter mesh of the y-strainer must be smaller than the gaps between the brazed-plates.
Otherwise, the brazed-plate heat exchangers will do the filtration work better than the y-strainer and obviously, not as intended.
Y-strainers should be installed with their filter mesh facing either down or side. Also, sufficient spaces must be allocated not only for people to work but also for tools such as spanners to turn and open the filter side of the y-strainer.
In addition, y-strainers can be installed vertically.
Me and my service technicians had encountered many y-strainers that are unable to clean because there was not enough space for us to use any tool to open the y-strainer. Hence, many y-strainers are not cleaned due to this reason, causing low-performance issues.
On a side note, if you want to quickly learn about chilled water system, you can get my Chilled Water System (eBook). If you’re into design, you can enroll in my Chilled Water System Design Course where I teach you various design procedures with tons of examples.
Chilled Water System Design Course
Learn how to design a chilled water system with AHU/FCU selection, chiller sizing, cooling tower sizing, pump sizing, piping design, ductwork design and more.
Flexible Joints
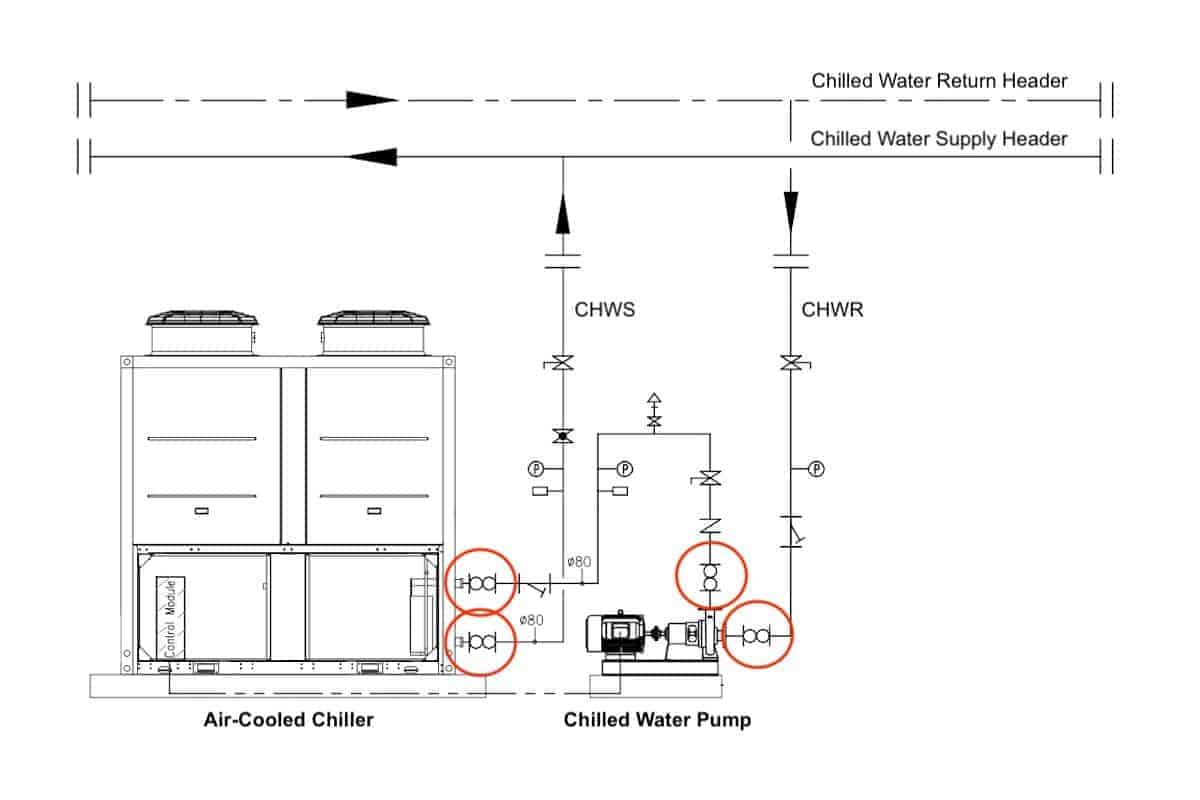
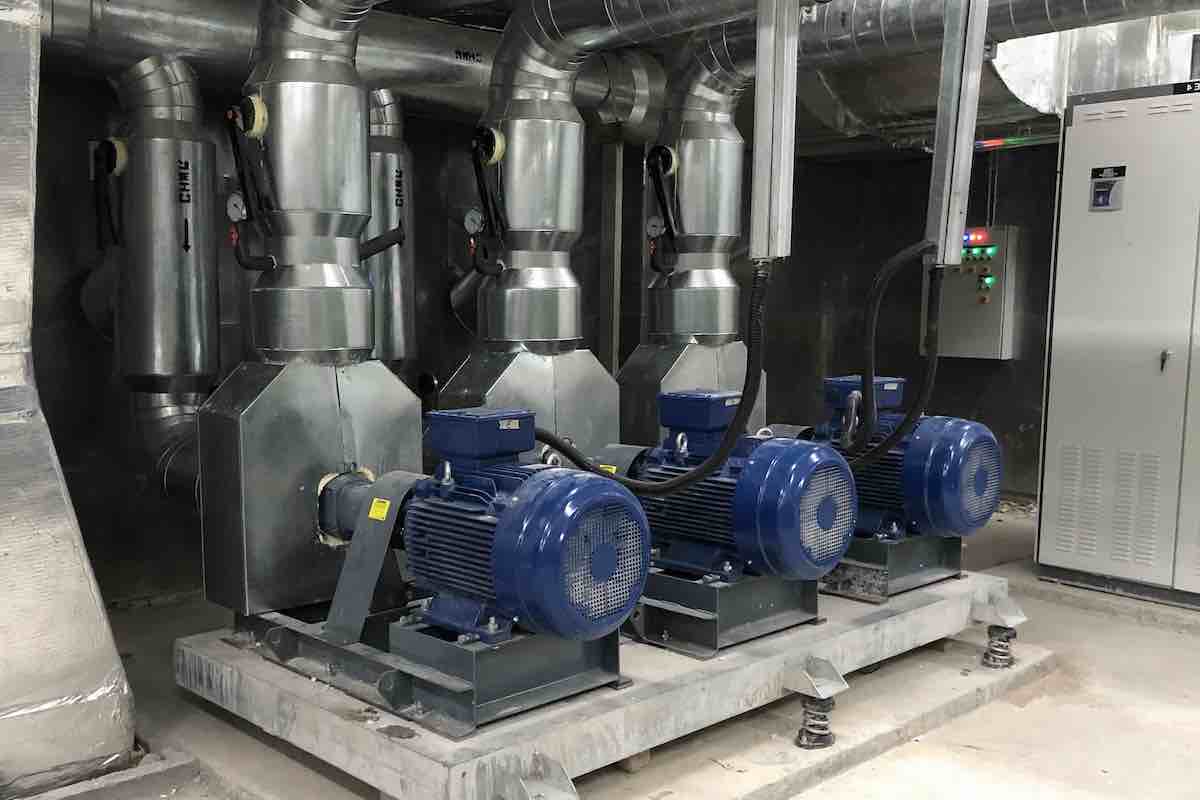
Flexible joints are used to prevent the vibration of chilled water pumps from transmitting to the piping system.
Flexible joints are made of rubber with a flange connection most of the time. However, smaller flexible joints do use thread connections.
Small pumps may not need a pair of flexible joints but large chilled water pumps definitely required.
Not only chilled water pumps, chillers that do vibrate also need a pair of flexible joints. They are installed near the inlet and outlet of chilled water pumps.
Flexible joints have two types; a) single bellow and b) double bellow. Double bellow flexible joints are more expensive but they provide better vibration isolation.
Flexible joints are usually installed horizontally, in line with chilled water pumps. But, they can be installed vertically if there is not enough horizontal space.
Check Valve
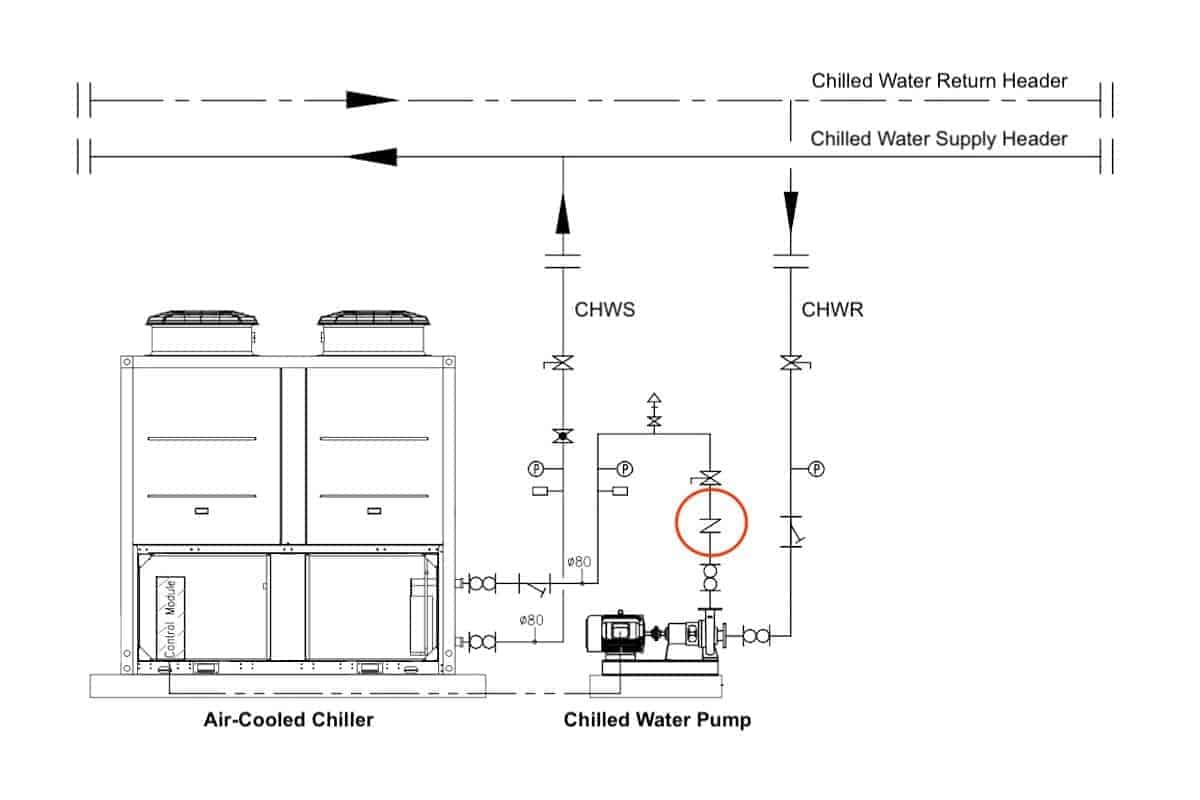
Check valves only allow water to flow in one direction. They are mechanically designed to close when water is flowing in the wrong direction.
A check valve is also known as a non-return valve.
When dealing with a header with multiple branches, a check valve must be installed at each branch. If there is only one chilled water pump with no header, a check valve may not be required.
In the event, if a chilled water pump malfunctions and stops working, a check valve will prevent other chilled water pumps in the same header from pumping water through the chilled water pump which may cause damage and reduce performance.
Check valves can be installed vertically or horizontally. They are usually installed after the chilled water pump outlet.
The reason why check valves are installed after the outlet instead of the inlet of pumps is to prevent high-pressure liquid from spinning the pump impeller backward which may cause more damage to the pump motor.
However, installing a check valve before the inlet of chilled water pumps in low-pressure applications may not be a concern at all. In fact, it prevents the water from constantly spinning the pump impeller.
Pressure and Temperature Gauges
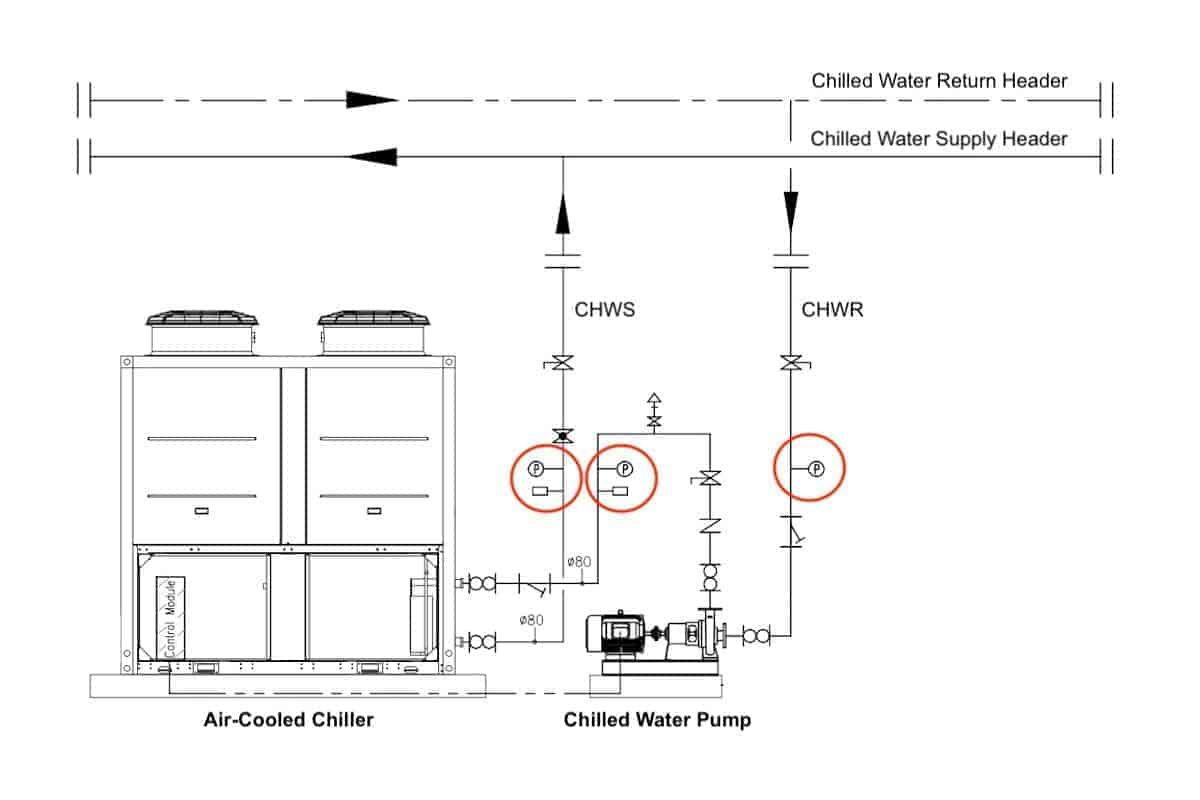
Pressure gauges and temperature gauges are important accessories for us to monitor the performance of chilled water pumps and the overall chilled water system.
Nowadays, many chilled water systems incorporate digital sensors and link them back to the building management system for remote monitoring.
Sometimes, the HVAC contractor is only required to provide thermowells or sensor pockets for the BMS contractor to install their own sensors.
Pressure gauges are usually installed before and after a chilled water pump to check and monitor the pressure differences.
Pressure gauges and temperature gauges should be installed not too high or too low, so that people can easily see them. Typically, they are installed at about 1.8 meters vertically on the chilled water pipe.
Installing pressure gauges and temperature gauges horizontally is possible but it’ll be too difficult for people to see and thus, not a good practise.
Most chilled water systems have a system pressure of about 16 bar. Hence, the range of pressure gauges must be select appropriately to maximize precision.
Besides, the dial size of pressure gauges must be relatively big enough for people to see the reading from a distance. Usually, a 4″ dial size is good enough for chilled water pumps.
Like any other threaded accessories, pressure gauges also come in either BSPP or BSPT standards. Some pressure gauges may use NPT standards. So, be sure to check the specification to avoid water leakages.
If you have no idea what thread size to use, 1/2″ is generally a good choice for all accessories including pressure gauges, temperature gauges, temperature sensors and thermowells.
Air-Vent Valve
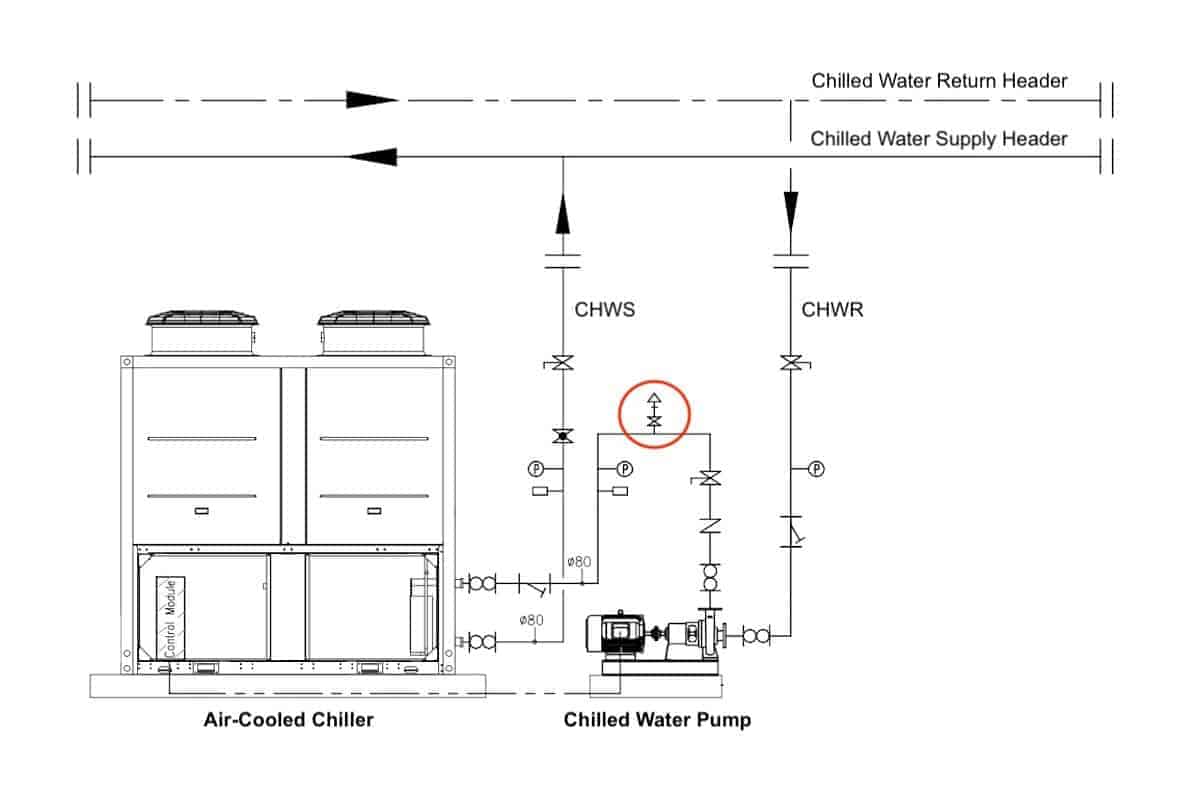
Air-vent valves are mechanical valves that purge air out of the chilled water piping system. They are installed at the highest point to be effective.
Air-vent valves must be installed upright and thus, located on horizontal pipes.
Air-vent valves purge trapped air automatically. Typically, air-vent valves have a floatable steel ball inside that floats and close the valve when the water level rises.
When there is air present in the piping system, the air will naturally go to the highest point where the air-vent valve is located at. The air replaces the water which brings down the floating steel ball and opens the valve.
The air released from the air-vent valve and the floatable steel ball close the valve again when all air is being released and the water level rises back.
An isolation valve should be installed before the air-vent valve to enable the replacement of the air-vent valve. Without the isolation valve, you’ll need to stop the operation of the chilled water pump in order to replace the air-vent valve.
Pipe Fittings
Chilled water pumps may have a few pipe reducers to accommodate some of the different valve sizes at the connection. Pipe reducers are most likely needed at the inlet and outlet of chilled water pumps. Besides, pipe elbows (90 degree and 45 degree) are inevitable.
Most people encourage the use of 45 degree pipe elbows because 90 degree pipe elbows are causing more water pressure drop. However, 45 degree pipe elbows occupy more spaces.
When you’re designing a chilled water pump connection, you may allow a 300mm short piece of pipe in between each valve. Besides, put a 300mm short piece of pipe before a 90 degree elbow for better flow. If you really have no space, use 150mm instead of 300mm.
In addition, be careful with butterfly valves as they need some space clearance at the inlet and outlet for their orifice to open. As a general rule, we should not connect two valves side by side without having a short piece of pipe in between them.
Once again, you can get my Chilled Water System (eBook) to quickly learn more about chilled water system. But, if you want to learn how to design a chilled water system from start to end, I encourage you check out my Chilled Water System Design Course.
Chilled Water System Design Course
Learn how to design a chilled water system with AHU/FCU selection, chiller sizing, cooling tower sizing, pump sizing, piping design, ductwork design and more.
If you have anything to add (or ask) about this topic, leave a comment down below!


