Mobile Home Mini Split Purchase and Placement Guide
If you are thinking of buying mini splits and install them in your mobile home, it’s important that you purchase the correct size mini splits and place them at the right location. So, I put together a guide on the purchase and placement of mini splits in mobile homes.
Basically, there are only two things that you need to make sure you get right. First is the capacity of mini splits. Second is the location of mini splits in your mobile home. Other stuff is just complimentary but I’ll cover them in this post as well.
In case you want to know what are the consequences of not getting the two important things correct, having under-capacity mini splits needless to say will not able to provide sufficient heating and cooling.
On the other hand, over-capacity mini splits will not be able to reduce the humidity level in your house to about 45-55% relative humidity which is the standard comfortable humidity level that prevents mold and fungus grows (they start to grow at 65% relative humidity).
About the location of mini splits, it affects the performance of mini splits in terms of comfort and power consumption. Strategically place your mini splits is the key to get the most out of the mini split and yield the fastest return on investment.
Step by Step Guide on Getting Mini Splits in a Mobile Home
Bring out your mobile home floor plan and prepare a measuring tape and a piece of paper. Start by measuring the square footage of rooms that need heating and cooling.
Following is a step-by-step guide to find the suitable capacity for your mobile homes. I’ll be using a standard 16×80 single-wide mobile home as an example to do with you together.
Step 1: Divide Your Mobile Home into Separate Spaces
Divide your mobile home into separate spaces that need heating and cooling. Include any adjacent spaces that don’t have a door to block the air from going into that space.
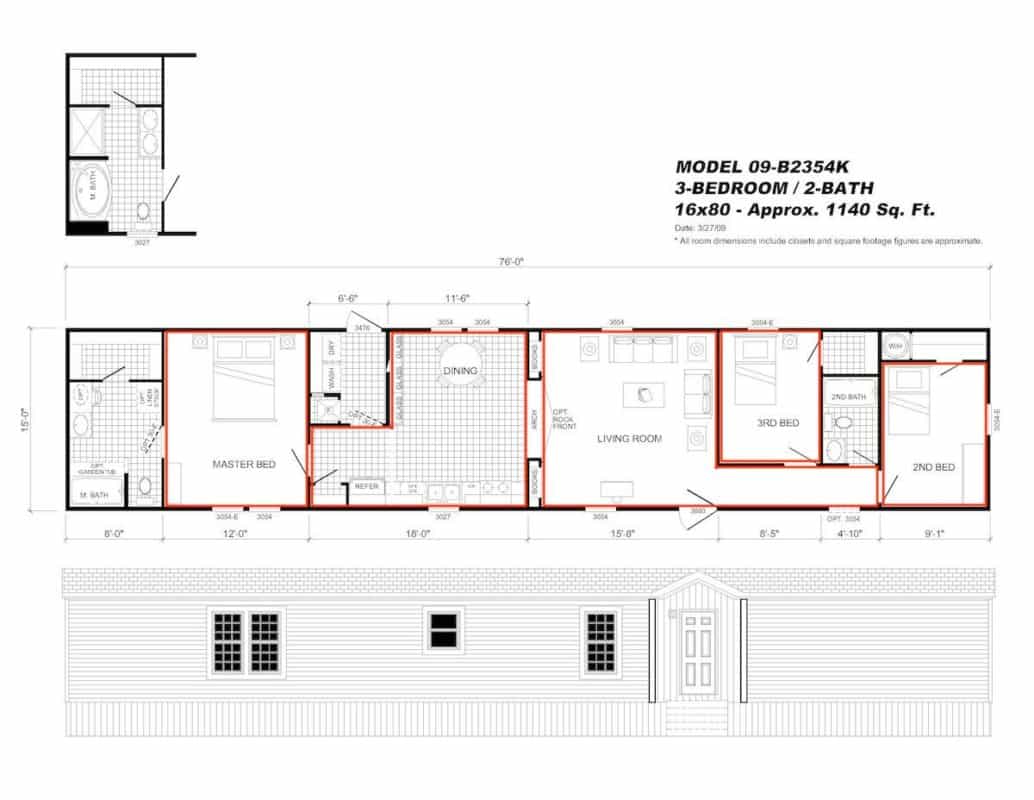
Step 2: Label the Spaces that You Divided
Label the spaces that you divided. You can use A, B, C… or name them using room names such as master bedroom, living room, dining room… and etc.
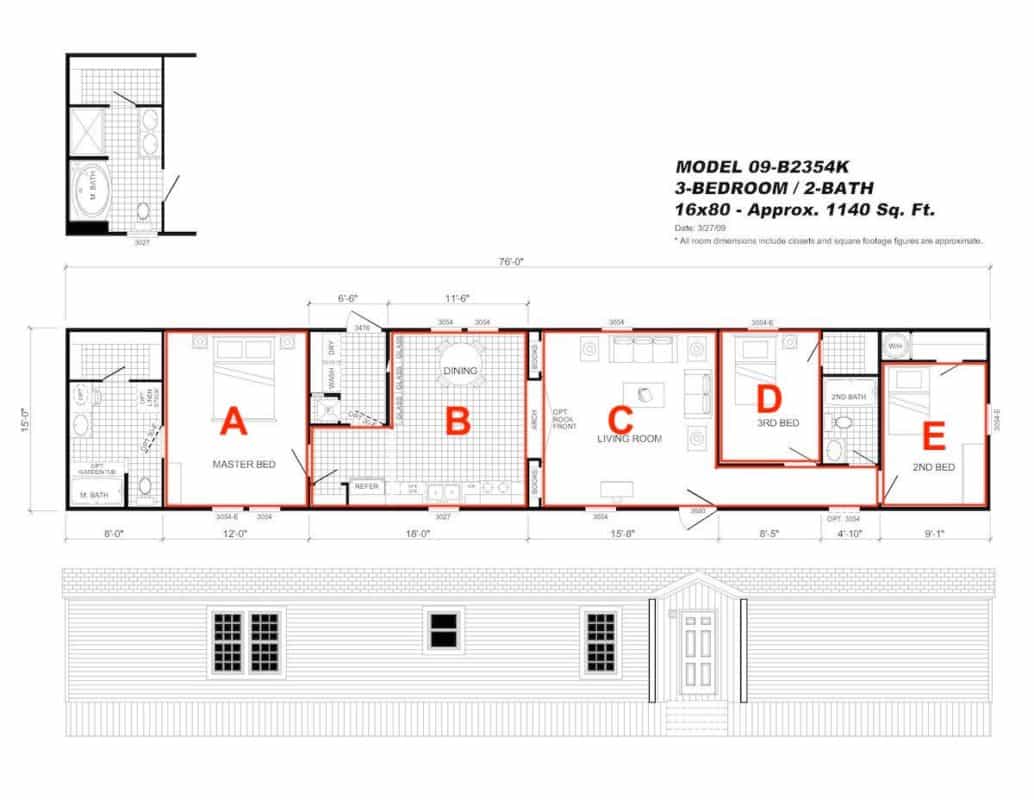
Step 3: Measure and Obtain the Square Footage of Each Space
Measure the length and width of each space and multiply them to obtain the square footage or area of each individual space. Write them down on the floor plan or a piece of paper together with the room name that you just labeled.
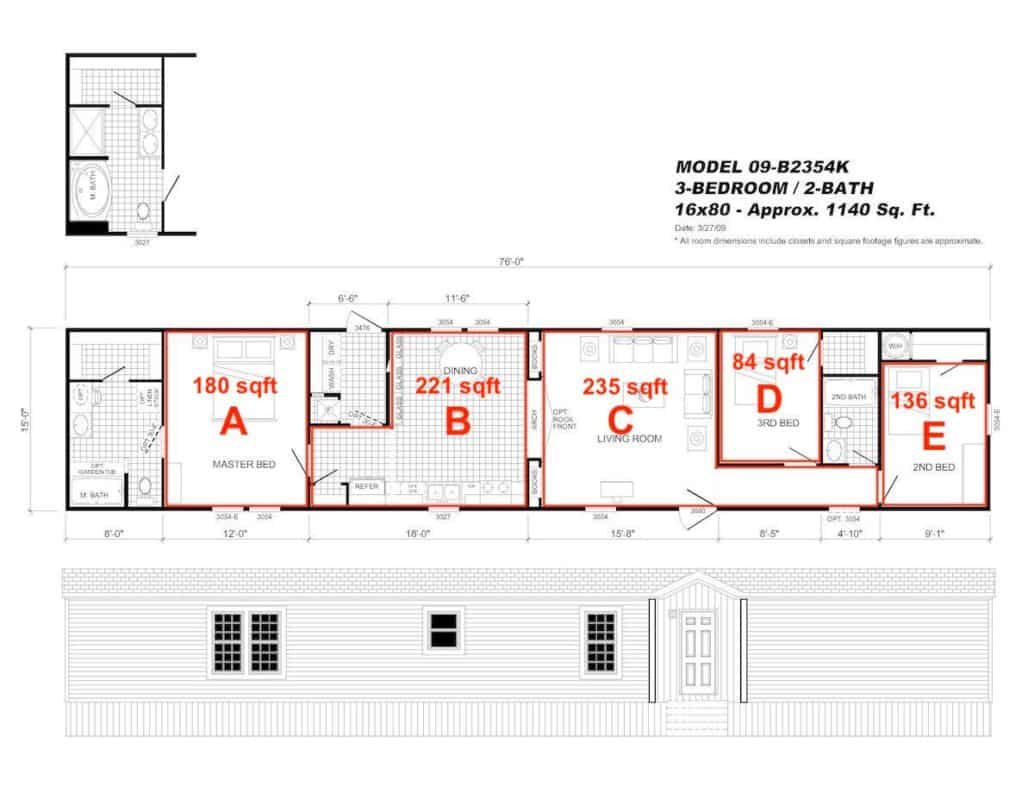
Step 4: Calculate the Capacity Needed for Each Space
Calculate the capacity needed for each space. Generally, you need about 30 BTU per square foot for new mobile homes with a standard R-19 grade wall insulation. If your mobile home is made before the year 1979 which has very poor insulation and you are not planning to re-insulate it, you’ll need about 50 BTU per square foot.
Be careful when using online calculators as they are mostly designed for standard single-family homes with good insulation. Most online calculators tend to result in about 20 BTU per square feet of capacity needed which may not be enough if your mobile home insulation is not as good as a single-family home.
For my 16×80 mobile home, I assume standard-grade insulation. So, I’ll use 30 BTU per square foot to calculate the capacity needed.
| Space | Area (sqft) | Capacity Needed (BTU) |
|---|---|---|
| A | 180 | 5,400 |
| B | 221 | 6,630 |
| C | 235 | 7,050 |
| D | 84 | 2,520 |
| E | 136 | 4,080 |
Step 5: Select the Mini Split Capacity
Select the nearest mini split capacity based on the capacity needed for each space. The minimum capacity of a mini split is 9,000 BTU. However, it has inverter technology that enables it to operate typically anywhere between 4,400 BTU and 10,500 BTU.
Now, I have a problem with Room D which has 84 square feet and 2,520 BTU of capacity needed only. A single 9,000 BTU mini split is too much for Room D. Meanwhile, Room E is also on the edge of getting an oversized mini split.
Hence, I can either don’t install a mini split in Room D or put a divider outside Room D just before the main entrance door to group Room D and Room E together. Then, both rooms will have to sleep with the door open and share the heating and cooling.
So, I decided to use a room divider curtain to separate Room D and Room E from the living room and group both rooms together for a single 9,000 BTU mini split. Both rooms will have to sleep with the door open.
Furthermore, since my living room and dining room are connected, I combine both rooms and use a bigger capacity mini split so that I save cost on purchase, installation and future maintenance. Since both rooms in total required 13,680 BTU of capacity, I decided to go for a 18,000 BTU mini split to account for the heat gain/loss through the main entrance door.
| Space | Area (sqft) | Capacity Needed (BTU) | Mini Split Capacity (BTU) |
|---|---|---|---|
| A | 180 | 5,400 | 9,000 |
| B+C | 456 | 13,680 | 18,000 |
| D+E | 220 | 6,600 | 9,000 |
Step 5: Plan the Mini Split Position
Plan the mini split position strategically for the best air circulation. For the bedroom, avoid having the mini split blowing air directly onto the bed as it’s not good for the health. Besides, place the mini split on the shorter wall instead of the longer wall for better air circulation.
For my mobile home, the best place to put the indoor unit in the bedroom is directly above the bedhead. It avoids blowing air directly onto the bed and it is near to the outdoor unit.
Since I use one mini split for both the living room and the dining room, I need to place the indoor unit in such a way that it blows past the living room into the dining room. If I put it the other way round, it’ll fail to cool/heat the dining room because of cold/hot air short cycling.
Similarly, I also need to place the indoor unit using the same principle as the living room for Room D and Room E that I’d grouped together. With a room divider curtain, cold/hot air is trapped inside the thermal zone which I’ve created.
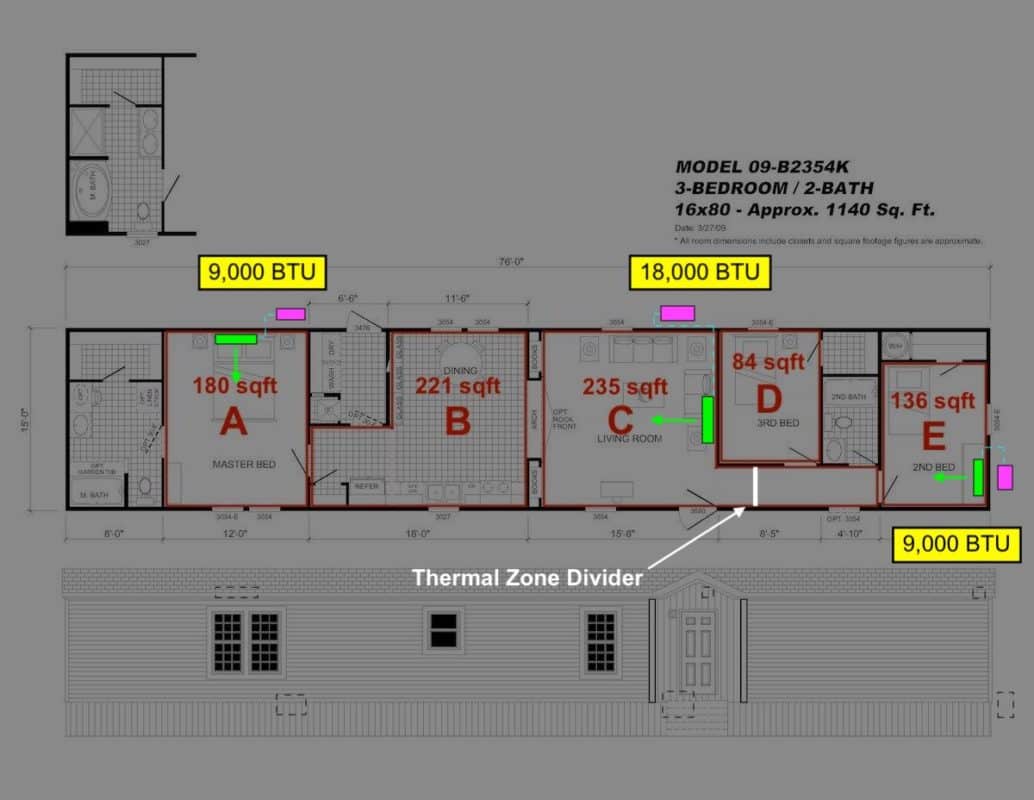
In addition, I put the outdoor unit away from Room D to reduce noise that could be heard by the person sleeping in Room D through the window.
Notice that all outdoor units are elevated from the ground to avoid the flood. The best height for an outdoor unit is about 1 ft to 1.3 ft above the ground and mounted on the wall using an L-bracket. However, you may also set it on a stand bracket or concrete plinth but I don’t like to use a plinth.
For the indoor unit, it should be installed at a height of about 7 ft to 8 ft above the floor but leave about an 8″ gap between the indoor unit and the ceiling for a good return airflow and easy maintenance.
I have a post Where to Put a Mini Split? (Detailed Photo Examples). I strongly suggest you read the post or at least capture the space recommendation drawings that I attached in the post. They’ll help you avoid making silly mistakes.
Step 6: Decide Between Single Zone and Multi Zone
Now, you have a complete single zone mini split system on your hand. But, you may want to consider using multi zone system instead. Multi zone system may be a more cost-effective solution for you.
If I decided to use a multi zone system, I would have one outdoor unit instead of three. That can make my mobile home looks better from the outside. Furthermore, I maintain two fewer outdoor units.
Besides, the installation cost is directly proportional to the number of mini splits. The more you have, the more you pay for the installation including the electrical work.
However, the major downside of a multi zone system is that once the outdoor unit malfunction, your entire home has no heating or cooling. As I know heating is critical in some regions, I would not suggest you go for a multi zone system.
In addition, you’ll have 3 refrigerant lines running outside your home from the indoor units to the outdoor unit if you’re using a multi zone system. In turn, it may not be as good-looking as using multiple single zone units as the refrigerant lines are short.
If you ask me, I pick reliability over aesthetics. So, I’ll go for 3 separate single zone mini splits.
Step 7: Final Adjustment
For my living room and dining room, I can choose to have two 9,000 BTU mini splits instead of one 18,000 BTU mini split. It’s really up to you and your mobile home layout. As a general rule, the lesser the air conditioning unit, the cheaper the cost to purchase, maintain and repair.
Mobile homes have vertical wood supports along the exterior wall. Hence, make sure you support the mini splits on them for long-term integrity. In addition, it’s recommended to put vibration isolators or rubber pads on the outdoor unit to reduce vibration.
Bonus: Double-Wide Mobile Home VRV HVAC System
I just love to design HVAC systems. Since I’ve not talked about double-wide mobile homes, I got a chance to show you a complete VRV system in a 32×68 double-wide mobile home based on Daikin’s models (link to product page).
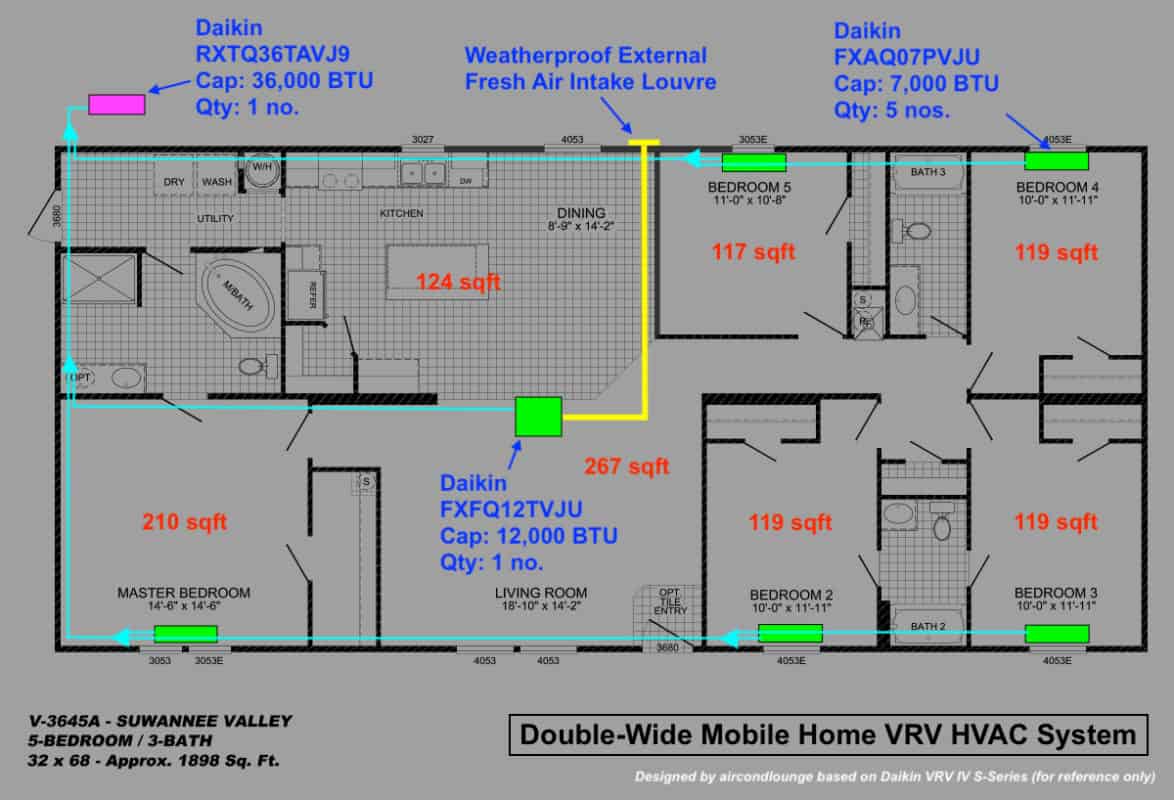
In this double-wide mobile home, the living room has a 4-way ceiling cassette unit that also draws in fresh air to maintain a healthy air change. The rest of the room is using a basic wall-mounted VRV indoor unit.
Unlike the multi zone mini system, the VRV system only has one refrigerant line that the next indoor unit just tap on and runs all the way to the outdoor unit. They use a refnet joint for the intersection (drawn as a triangle).
If you have a double-wide mobile home or any other large home, you may consider installing the VRV system. It offers the best efficiency you can get for a home HVAC system excluding geothermal units. It is a premium HVAC system that is usually used in mansions, villas and high-end condominiums.
Check out VRF Working Principle (Air-cooled & Water-cooled).
All VRVs are centrally monitored and controlled. If you have spares for bells and whistles, the VRV system is an excellent choice for your home HVAC system.
Final Thought
Mini splits in mobile homes are no different than mini splits in other houses. There are no mini splits specially made for mobile homes because it’s unnecessary.
Nevertheless, mini splits are great for heating and cooling a mobile home. Old furnaces and central air conditioners are going to be obsoleted as the technology advanced. So, stay ahead with the mini split.
Lastly, consider my Mini Split (eBook) if you want to know how can you use Mini Split in your house. If you still have doubt or not feeling confident enough, feel free to consult me.
Consultation Service
Ask me for HVAC advice such as brand selection, best model, benefits, features, placement, duct size, grille size, how to design, design check, verification and other HVAC related queries.
If you have anything to add (or ask) about this topic, leave a comment down below!


